Pages

1.29.2012

Trick to Mincing Ginger & Homemade Ginger Syrup


I love ginger. And it's not just because my son is the most handsome ginger I know. 


Here he is patiently waiting for his food at a farm to table dinner at Half Pint Farm in Burlington. He wanted me to shave him a mohawk and the kid has a funny ridge in his head so we ended up with an abstract one :) 

Ginger is a great ingredient- it makes it's appearance on our table frequently and after googling and researching we will try to grow some this summer. For now I pick up copious quantities of it cheaply anytime I can make it by Haymarket in Boston. Apparently, it's also known to have inflammatory characteristics and can possibly prevent skin cancers. Wow, yummy medicine!

I'm a little lazy though. So one day I decided to put it through my garlic press, because mincing ginger is not a favorite task of mine. Perfection. Not only did I yield way more ginger juice in the recipe but all of the fibers stayed in the press. And for you visual learners here are the pictures to prove it:

Put the piece of ginger in the garlic press. Don't even bother peeling it. However, I'm not going to lie, it's  easier if you peel it.

Holy ginger juice! That would have been wasted all over the cutting board.  Now take a knife and run it over the ginger hanging off the press. Anything that comes off easily will be used in your recipe. The stubborn fibers will remain.

If it didn't come off easily then don't worry about it. It's too tough to use and you're better off without it. 

This dry compacted fiber is what I took out of the press and composted when I was done.

Hope this helps you in your culinary pursuits! Read on for a ginger syrup recipe to make your own ginger ale.

We own a SodaStream. It has changed our life (and our finances). My husband drinks seltzer like it's going out of style and I hate buying soda. We don't drink a lot of soda but this past week the warrior princess had chicken pox. Joy.

In the early 30 count phase. Pox covered doll was a family joke. 

All the memories I have of being sick when I was younger revolve around getting to have ginger ale, a big deal in our soda-free household. So while home caring for the pox-covered princess I decided to take the pound of ginger I had recently purchased and make soda syrup. 

I used about 6 oz of ginger which looks like this.
Peel the ginger.

Slice it lengthwise into thin slices. 
Start a pan of simple syrup going over low heat. Use equal amounts of water and sugar. I used 2 cups of water & two cups of sugar which yielded a pint of finished syrup- one pint jar & a little bit to sample.

Once the sugar has melted into the water add the sliced ginger & simmer for 45 minutes to an hour.
Store it in the fridge for up to two weeks. I love using a little of this in hot water with sliced lemon for a great cold-fighting ginger tea. You can also drizzle this over ice cream or over fruit.

Ginger-y delicious. Enjoy! We use roughly 1/3 cup per liter of soda- adjust to your taste.
Just be warned that this stuff is so yummy it may induce a happy ginger dance. 


1.26.2012

Baked Mac & Cheese with Homemade Breadcrumbs

Earlier I posted a recipe for homemade Tarragon Thyme Pumpernickel Bread Crumbs. All day I've been thinking about how I could use these in dinner tonight. I didn't have any meat out so I decided to do a breadcrumb topped mac and cheese and mimic the flavors in the pasta.

This post is picture heavy because my lovely husband decided to play photographer again. Personally, I think he was just using it as an excuse to stay near my bowl of shredded cheese which somehow dwindled in ounces while he was in the kitchen.


Baked Mac & Cheese with Homemade Breadcrumbs
(serves tons- makes 2 casserole dishes full)

4 cups dried macaroni (they consider a half cup a serving so technically this is 8 peoples worth of mac)
2 cups milk of your choice (I had whipping cream on hand that needed to be used so I used 1/2 c whipping cream and 1 1/2 cups nonfat milk.)
1/4 cup butter (1/2 stick)
1/4 cup flour
1 tsp dried mustard
1 tsp thyme
1 tsp tarragon
1 tsp kosher salt
1/2 tsp pepper
14 oz shredded cheese (You can mix types- I used a bit of parmesan and the rest cheddar.)
1/2 cup breadcrumbs

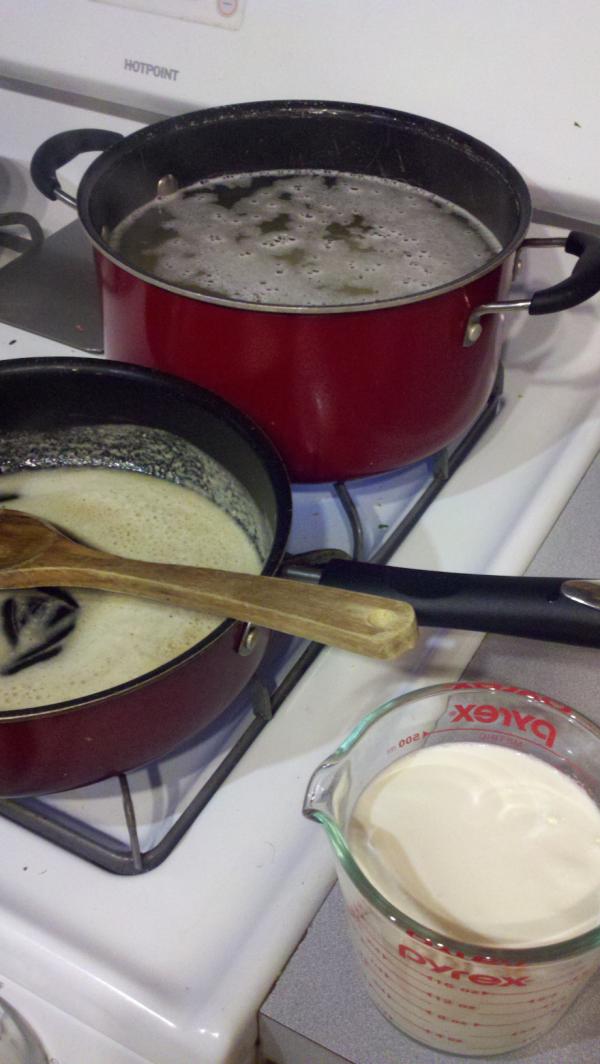
1. Start water boiling for the macaroni. Add 1/2 tsp of the kosher salt to the water. Once boiling, add macaroni and boil until al dente. You should be able to finish the other steps by the time the mac is done boiling. Preheat oven to 375.

2. In a saucepan, melt the butter. When the butter is melted stir in the flour. Your goal here is to make a white gravy for the macaroni. Stir occasionally for about 3 minutes until the gravy turns tan and is well mixed. Add in the dairy.

3. Continue to stir occasionally over low-medium heat. The sauce will start thickening. Get your herbs & spices ready. 
Stir the herbs into the milk, butter, flour mixture. 
Turn to low. 
4. This is the point where I realize that I haven't shredded the cheese yet. We go thru large amounts of cheese in our house so I buy the giant  2 lb block for $8.49 and shred as needed. You could save yourself a step and buy your cheese shredded. You will need to shred 14 oz. If you don't have anyone in your kitchen trying to steal the shredded cheese as you cook with it you could make do with 12 oz. 

Saving 2.5 oz to use as topping, stir remaining cheese into the gravy and let it melt. 

5. At this point your macaroni should be done so go ahead and drain it. Then put it back in the pan. 
Make sure the cheese has melted into the gravy. Turn the burner off and dump the cheese mixture into the mac. 
Stir it up until every noodle is bathed in cheesy loving. 
6. Split the macaroni between two casseroles that have been sprayed with cooking spray. I also split off a small tupperware full of the macaroni to save for a toddler dinner. I also find that if you bribe your children with macaroni they'll stay quiet while it cooks. 
Yay macaroni!

Nom nom nom. 

7. Sprinkle tops of casseroles with remaining cheese & breadcrumbs. I used about 1/4 cup of breadcrumbs on each one. Put in oven and bake for 20 minutes on 375. 


8. Take out and let rest for 5 minutes. Dish out and enjoy!


Tarragon Thyme Pumpernickel Bread Crumbs


I have a problem. Ever since I learned how to make bread with a super simple easy to adapt recipe for roughly 53 cents a loaf I've been baking bread constantly. This is good for my freezer which is now stocked with a variety of types- Potato Garlic,  Thyme Rosemary, Oatmeal Buttermilk, Sourdough, and Pumpernickel.


Since I make two loaves from each recipe I freeze one. But we don't always go thru the bread I keep out fast enough, especially if I've gotten carried away. So I've started making breadcrumbs, which both saves the bread and saves me money. I also get to pick my own flavor combinations this way.

It's easy.

Pick your bread. I used pumpernickel. 


Cut a few slices (I did 4) and put them in the toaster. You want to toast them about 2-3 times. The goal is to get them really crispy, not burn them. 


While the bread is toasting pick out your herbs. I also like to use a little sea salt to salt my breadcrumbs. The salt enhances the herb flavors. I used roughly 1/2 tsp each of tarragon, thyme & sea salt. Adjust the seasoning to match the amount of bread you are using. 


Once the bread is done toasting, put it in the food processor and process. Note: This will be loud and will wake a napping baby. Once the bread is in crumbs add the herbs and process for another minute. 


Now take the breadcrumbs and spread them in a pan. You want to leave them overnight to dry out any excess moisture in the crumbs. We have a wood stove so I put the pan on a trivet on the surface overnight.

Put your crumbs into a mason jar and set aside for future culinary inspiration. Enjoy!


1.25.2012

Mint Chocolate Chip Granola Bars

I've created a monster. Last week after toying around with granola bar recipes I found myself in our local discount store. A box of Cocoa Krispies for $1.69 and a bag of Limited Edition Nestle Dark Chocolate & Mint Morsels called my name and a few days (and half the bag of morsels later) I found myself making more granola bars. They should be called candy bars but calling them granola bars makes me feel better about how many I've eaten. After I took the picture for this post, I ate my subjects.


Mint Chocolate Chip Bars
(makes 24 skinny bars, I cut them on the chunky side making 18)

3 cups Cocoa Krispies
1 cup quick oats
1/2 bag Nestle Mint Chocolate Morsels (5 oz) - If you can't find the morsels you could chop up Andes candy or find another minty substitute. Keep them in the fridge until you're ready to use them. It helps them keep their form in the bar and not melt into goo.
1/4 cup butter
4 TBS Fluff (I eyeballed it. Spraying the spoon with cooking spray helps the fluff to slide off a little better.)

1. Combine Cocoa Krispies & oats in a mixing bowl. 

2. In a small pan, melt butter and add Fluff in. Cook on low heat for 5 minutes, stirring frequently until smooth. While Fluff & butter are cooking, cover a cookie sheet with tinfoil & spray with cooking spray. 


3. Pour Fluff mixture into dry ingredients and mix until they all look sticky. Add mint chips from the fridge and stir just long enough to mix. 


4. Spread mixture evenly over cookie sheet and cover with a sheet of waxed paper. Press down hard thru the wax paper to compact the mixture into an even, flat layer of delicious-ness. Put the cookie sheet in the fridge for an hour. After one hour take out & cut into desired number of bars. I store my bars in the fridge because I like the way they taste cold. (Please note: I didn't take pictures of these steps so I am including ones I took for my other granola bar recipe. The bars did not magically change colors!) 


Enjoy & try not to eat all in one sitting! 


1.24.2012

Baked Jalapeno Boats


My husband loves spicy food. Loves it. He made his own hot sauce one summer with jalapenos and habaneros from the garden. The house filled with a thick spicy stench and I had to take the 2 month old out while he finished his creation. So, when I happened to be down in Boston meeting clients on a Friday I swung by Haymarket and snatched up 3 pounds of jalapenos. I figured I'd can most of them but then got a pregnant craving for jalapeno poppers. This version has all the taste but is gluten-free and much lower in fat  by eliminating the frying. Just in time for Superbowl snacks.

As a fair warning I asked my husband to take the jalapeno slicing pictures since I was wearing gloves. He got really into it, REALLY INTO IT, taking multiple angle shots and telling me that his pictures didn't even need captions. Glad he's a happy participant!

Baked Jalapeno Boats
(makes 24 boats)

12 jalapeno peppers
2 oz cheddar cheese
1 8oz bar lowfat cream cheese
1 1/2 tsp cumin
1/2 TBS dried cilantro
zest of 1 lime
juice of 1/2 lime

1. Preheat oven to 425. Wearing gloves wash off jalapenos, slice of tops, cut lengthwise, and scoop out seeds. (Please enjoy the next set of pictures courtesy of my snap-happy husband.)


2. In the food processor, shred the cheese. Add all other ingredients and mix. 


3. Fill jalapeno boats with a scoop of the cheese mixture in each. (Put into a tinfoil-lined pan (easy cleanup). Bake at 425 for 15-20 minutes. Fifteen minutes will yield crunchier boats, twenty minutes will yield softer more cooked jalapenos. Enjoy!