Pages

Showing posts with label Baking. Show all posts

10.27.2012

Chocolate Peanut Butter Bars AKA Party In Your Mouth

Pinterest viewing can be fattening to your health. I saw a picture on Pinterest of a Chocolate Peanut Bar (they called it a Reese's bar but I really don't want to be sued by Reese's since it contains no actual Reese's) and it reminded me of my Starbucks days. I worked at Starbucks for six years. It was a great job in college and I have fond memories of sitting down after a shift with a hot cocoa and a chocolate peanut butter bar to study. Plus the recipe called for graham cracker crumbs, which leads me to the question- Why the heck are crumbs sold in such big boxers? I was more than happy to use up the rest of the box I had on these. I think it was originally from a cheesecake a few years ago.

The original recipe can be found on Let's Dish Recipes

I adapted it slightly to use up some extra Hershey bars from s'more season and after doing the first batch realized I would halve the amounts of the peanut butter layer to make a more balanced bar. Also, I make it in a square Pyrex not the 9*13 that was originally recommended. This recipe is by no means a healthy recipe so it's best made when you know it will be shared. Otherwise (if you're like me) you'll just grab a piece every time you open the fridge. 


1 cup graham cracker crumbs
1/2 cup melted butter
1/2 cup peanut butter (I spray the measuring cup with cooking spray so the pb slides out.)
1 cup confectioner's sugar
4 Hershey bars (1.55 oz bars) broken up into the squares
1 more large spoonful of peanut butter (roughly 2 TBS)

1. Melt the butter in a microwave or pan. In a bowl mix the melted butter, 1/2 cup of peanut butter, confectioner's sugar and graham cracker crumbs and stir until well mixed into a paste. Spray a square glass pan (9*9) with cooking spray then line the bottom with the paste. Even out the top so it is as smooth as possible. 

2. In a microwave safe bowl heat the pieces of Hershey bar and the large spoonful of peanut butter until the bars are melt-y. Stir and put back in for a few more seconds if you feel like it's not smooth enough. Just be careful, burnt chocolate does not taste good! Spread the chocolate peanut butter mixture on top of the peanut butter layer and smooth out the top.

3. Put the pan in the fridge for at least 30 minutes. Cut into squares and eat with friends! Beware they are addictive! I have found that storage in the fridge is best but taking them out and setting them on the counter for 5 minutes makes them easiest to cut. 

And yes I keep a fork & knife in the pan for ease of eating :) The fact that this many remain 4 days after I made them is a testament to my willpower.

I always have lots of help eating them.... 

9.03.2012

When Potty Training Gets You Down, Make Oven S'mores

Ahh, potty training. It's happening in our house and it's actually been going well. The toddler announces "Potty" and we stop whatever we're doing to hustle her off to the bathroom. With any luck she goes pee-pee on the potty (occasionally we catch her squatting in the hall on the way) and we clap (no, my 15 year old self did not see this coming). Then I walked into Target to buy "big girl" underwear and realized that all the "panties" have ruffles and glitter and decor on them. My mind started .... I want to say going in circles but it was more like an elf on a pogo stick eating cotton candy. Craziness. I don't want to get my daughter underwear that she wants to show to people because it's pretty! She turned two a week ago- this is not the age to start teaching her that underwear needs to be covered in glitter, lace, and Tinkerbell. And I certainly don't need her thinking it's to show off. So I stood there and deliberated and in the end against my usual thrifty behavior I bought her a pack of boys briefs. It came with half the amount of underwear and cost twice as much but at least I know that if she shows it it's because of her pride in the accomplishment of potty training and not because she has a fairy princess plastered on her behind.

Thinking about her wanting to show off her behind got me a little stressed out so I went home and made oven s'mores. We always have the supplies on hand and after some experimentation I've found that the inside ones taste pretty darn good in a pinch. They soothe a mother's frazzled soul :)

Oven S'mores
(makes 6- don't share....)

6 graham crackers
6 marshmallows
1 bar of chocolate (Hershey's)
a few teaspoons of Nutella
parchment paper

1. Heat oven to 375. Line a cookie sheet with parchment paper. Break the graham crackers in half (set aside half) and put them on the parchment paper. Take a marshmallow and put a little schmear of Nutella on it (it helps the marshmallow stay on the cracker and it tastes yummy). Repeat.


2. Bake for 4-7 minutes. Watch closely for the marshmallows to poof up. If you let them cook for too long the graham cracker can burn.


3. Pull out of the oven and top each with 3 squares of chocolate.


4. Eat while researching convents you can send your daughter to. Enjoy.


8.27.2012

Chocolate Beet Cupcakes


"There are beets in these? Really?" That was the overwhelming reaction to the cupcakes I served at my daughter's birthday party this weekend. The next statement, "So that's what you're doing with all those beets!" (I had been posting pictures like this for weeks.)

As part of our CSA share I signed up for the extra cost "preserver" option. I had been getting a lot of "second" beets. That's right, it's not just Old Navy Outlet shirts that are seconds. Some beets are just not as pretty as others and these aren't sold to restaurants. Lucky for me I just puree them and then they look beautiful. All of the above beets were topped & tailed (translation- I chopped the roots and tops off) and then they roasted in the crockpot for a few hours. I pureed them peels and all and measured 12 oz into each freezer bag. Seal them, double checking to make sure the top is sealed, and then spread the bag flat. You can store a ton of them in very little space in the freezer this way. Since they are thin they also thaw very quickly. The cupcakes made from these are moist, gooey and delicious. They are like individual brownies or chocolate cakes.

Chocolate Beet Cupcakes
Makes 12

1 1/2 cups pureed beets (you can use a can of beets & puree them if you'd like- a 15 oz can with a little additional water would do the trick)
3/4 cup flour
3/4 cup sugar
1/2 cup cocoa
1/4 + 1/8 cup milk (can be replaced w/ non dairy milk for vegan)
1/2 tsp salt
1 tsp baking soda
1 tbsp baking powder
1 cup chocolate chips (can be replaced w/ carob chips for vegan version) The chocolate chips add a gooey decadent feel to the cupcakes- reduce the amount if you don't want them as gooey.

1. Preheat oven to 350.
2. In mixer, mix together beet puree, flour, sugar, cocoa, and milk. (I measure everything out using a 1/4 cup measure- then I use the same cup to "dose" out each cupcake into the pan, only 1 cup to wash then!). Add the salt, soda, and powder and mix. Add the chocolate chips and mix to distribute. The batter will look luscious and red velvet-esque.

Use liners! These moist cupcakes are easiest to store when in liners.
3. Bake at 350 for 20 minutes.  Take out and let them cool. Resist the temptation to eat them all. If you're throwing a monster birthday party for your 2 year old feel free to frost them and give them eyes made out of candy :) They also freeze fantastically and can be pulled out and microwaved for 30-60 seconds for a quick chocolate fix that's chock full of veggies!


8.23.2012

No Crumb Banana Chocolate Chip Muffins

My kids love muffins, particularly my toddler. If it's in muffin form she'll eat it. I love my kids but I don't love the disastrous crumb graveyards they leave everywhere after eating muffins. Enter my no crumb muffin. Yes, it's a bold statement to make but these muffins bind together so well I've even been known to hand my son one to eat in the car. These muffins are heavier than a normal muffin and have none of the "fluff" of a traditional muffin. That heaviness fills little bellies up and keeps them satisfied for hours.

See, no crumbs- even after gnawing thru one side. Chocolate face on the other hand is another matter.
No Crumb Banana Chocolate Chip Muffins
makes 12 large muffins or 18 medium ones

4 ripe bananas
1/3 cup brown sugar, packed
1/2 tsp salt
3/4 tsp baking soda
1 tsp baking powder
2/3 cup Stonyfield Farm Lowfat Banilla Yogurt (you can substitute your favorite flavor)
2 3/4 cup flour
6 oz chocolate chips

Preheat oven to 350. Spray a muffin tin with cooking spray.
Mash bananas (I was lazy and just whisked them in the mixer. Add in all other ingredients except chocolate chips. Mix until all ingredients are blended. Add chocolate chips and blend until incorporated. Scoop into muffin tins. Fill all the way for 12 muffins. If you fill 2/3 full it will make 18 muffins. They puff up quite a bit.
Bake for 20 minutes. Enjoy the easiest banana muffins ever, you can thank me for the lack of crumbs later :) 

Variation: Just made these with blueberry yogurt, cinnamon, and blueberries instead of chocolate chips- still used the banana. They are awesome but turned out a creepy gray color. May use this for Halloween!


7.28.2012

Homemade Seeded Energy Bread


We make bread 3 times a week. My son, who is here for the summer, started talking about a 21 grain bread by Killer Dave's that he has at his other house. We looked online and I determined that it was a mix of seeds and flours. I don't sweeten my bread so I was unsure of how popular the end result would be with an 8 year old if I omitted the cane syrup and molasses but I decided to give it a go. I raided our cupboards for seeds and grains and the end result was amazing if I do say so myself. It even uses chia seeds which are a great source of energy and very filling. This bread is the perfect start to my day spread with Pineapple Basil Preserves (recipe coming soon).

I asked my son what he would do if he liked this bread better than Killer Dave's. His response? "I'll ask for more." (And he did- it apparently is "Way better" and "Awesome").

We took a family poll and have deemed this bread Robust Rabbit Loaf. We have a robust (rotund) rabbit so we thought we would honor him with his own loaf.

A favorite nap spot- the bottom shelf of my desk. 


Robust Rabbit Loaf
Makes 2 loaves
3 cups hot water
1 1/2 TBS salt
1 1/2 TBS yeast
4 cups flour
1 1/2 cups cornmeal
1/2 cup rye flour
1/2 cup soy flour
1/2 cup sunflower seeds
1/4 cup sesame seeds
1/4 cup chia seeds
1/8 cup flax seeds
1/8 cup poppy seeds
3 TBS fennel seeds

1. In the bowl of a mixer with a dough hook attachment mix the water, salt, and yeast. Add the flours 2 cups at a time. This recipe makes a fairly heavy loaf- to lighten it a little reduce the amount of flour and up the soy flour. The soy flour yields a little extra lightness.

2. Once all flours have been added and the dough is mixed up add all the seeds in and mix until they are incorporated. Let the dough rise for 1-2 hours. (The warmer your kitchen is the faster it will rise.)

3. Preheat your oven to 450. Set a timer for 15 minutes. Spray the inside of two loaf pans with cooking spray. Split the batter between the two pans by pouring it in. Use a spatula to scrape any excess off the bowl. No punching or forming necessary.Set the loaf pans near the stove. The heat as it preheats will help the dough rise a little more. Bake for 25 minutes. Enjoy warm slathered with butter or jam!

4.12.2012

Make Your Own Crackers


If you have never made your own crackers you have no idea what you're missing! The recipe is easy, the procedures are straightforward, you just need the time to roll out the dough and bake the batches. The end result is delicious. I first made crackers for my husband to bring to an office Christmas party and now they're a favorite snack in our house and tend to disappear quickly.

Homemade Crackers
(Makes 20 dozen-ish, it's hard to get an accurate count as my husband was eating them off the cooling rack. Yield will also depend on size of cracker you make.)

6 cups flour
2 cups warm water
2/3 cup olive oil
2 teaspoons kosher salt
Any additional add on ingredients you'd like (I split my dough into three batches- the 1st batch were plain or had mixed seeds-fennel, poppy, and sesame- on top, the second batch had 1 tsp thyme & 1/2 tsp ground rosemary, and the third batch were spicy with 2 tsp of hot pepper flakes.)

1. In a mixer with the dough hook attachment measure out olive oil and add salt. Add warm water and add flour a few cups at a time mixing in between.


It will yield a large ball of slightly sticky dough. It won't look like a lot but it rolls out nicely.
2. Turn out a manageable ball onto a flour covered surface. The great thing about working with olive oil dough is that as it absorbs the extra flour from the counter it becomes very easy to work with. Flip it a few times to get flour on all sides. You want to roll it out thinly with a rolling pin. It will feel elastic-y almost like a pizza dough so you'll have to push hard. I'm short so I stand on a step stool to get a little leverage to push down. To prevent your crackers from sticking flip the dough one last time before you cut out the shapes. I use a biscuit cutter that is a 1" square to make roughly Triscuit sized crackers, I also have a slightly smaller square that I use sometimes to make Wheat Thin sized crackers. 

Make sure to have plenty of flour on your counter!

Push down really hard when you roll out the dough. The crackers puff a bit in the oven so you wan them thin. 

Cut squares. (or the shape of your desire)
Once your squares are cut out, transfer them to a foil lined cookie sheet sprayed with a tiny bit of cooking oil. You want to use a fork to poke at least a few holes in each cracker, otherwise they puff up in the oven while cooking. They still taste delicious when they puff it's just easier to put cheese on them if they're flat :) Bake in the oven for 8-10 minutes per batch. I can usually fit 30 on each tray. When they come out you can either cool them on a cookie rack or just dump them into a large mixing bowl to cool and to store. Repeat multiple times until all crackers are baked. 

See the tiny little poked holes? Very important detail!

My 8  month pregnant belly became a flour covered disaster during this cooking project!

Cooling plain crackers.

Varieties: Your flavor options are only limited by your imagination. One of the reasons that I do different flavors is that the dough is easier to work with when it is freshly mixed so as I add spices and remix the dough it becomes easier to work with. If you're going to make all plain ones I recommend keeping the extra dough in the bowl and mixing it occasionally to maintain it's workability. 

A mix of fennel, poppy, and sesame seeds.

Sprinkle a bit on each cracker and give each surface a light press with your fingers to make sure the seeds stay on the cracker. 

Another option is to mix add ins directly into the dough. This is how I make my rosemary-thyme crackers and my hot pepper crackers. 
Enjoy! This recipe offers a great opportunity for kids to help out and you can certainly make all kinds of fun shapes for them.


3.25.2012

Lime Coconut Sugar Cookies


I love treats. I do not claim this to be a healthful post, the cookies are sinfully delicious emphasis on the sin. Butter, sugar, coconut- they marry into a melt in your mouth cookie and the addition of lime zest and lime juice drive them over the top into magical territory. For years when I lived down in Boston one of my favorite treats was Dancing Deer Lime cookies. I had no self control. They came in 6 packs and they'd be gone in two days. These cookies remind me of them a little.

Lime Coconut Sugar Cookies (2.09/batch)
(makes 3 dozen)

1 stick of butter, softened a bit (1/2 cup) (2.99 for 4 sticks) .75
1 cup of sugar (3.99 for a 5 lb bag- 11 1/4 cups/bag) .35
1 egg (2.95/18 pack= .16/egg) .16
1 lime- you will use all the zest and all the juice .33
1/2 tsp baking powder
1/2 tsp kosher salt (reduce to 1/4 tsp if using table salt)
1/4 tsp baking powder
1 1/2 cups flour (I buy 25lbs at a time for 11.99- it breaks down to 13 cents/cup) .20
1/2 cup coconut (14 oz bag is 2.69= .19/oz) .30

1. Preheat oven to 350. Put the butter in the mixer (if you're using one). If the butter isn't softened make sure you lock the top of the mixer otherwise it will "bounce" around as it mixes the cold butter. While the butter is creaming zest the lime and juice it.


I put the zest & juice in the same bowl since they're going to the same place.
2. Add 1 cup of sugar and beat until fluffy. 

Fluffy creamed butter and sugar.
Add the egg, lime juice & zest. Whip it until well mixed, then scrape the sides of the bowl to grab any missed bits and push them into the batter.


My father-in-law got me this cool finger scraper spatula thingie.
Start whipping the batter again and it will get to look like this:


3. Now it's time to add the dry ingredients. I add the baking powder, baking soda & salt first and mix it a bit to make sure they blend in properly with no clumps. Then the flour, and the coconut is added last. 


4. In a little bowl put a few tablespoons of sugar- in my experience it takes about a TBS per dozen. You want to use a spoon to scoop little pats of dough. Then gently roll them into a ball shape- it doesn't have to be perfect and spin them around in the bowl of sugar to coat. They will cook 1 dozen at a time on a sprayed cookie sheet. 

Make sure to keep the scoops small. They expand a bit when cooked.

Roll in sugar.

Space out on cookie sheet- I'm a little embarrassed that I didn't have parchment paper to cover my loved cookie sheet. 
The cookies will cook at 350 for 9 minutes. You can put the dough in the fridge between batches so that it doesn't get too soft but I do not recommend refrigerating the dough for any longer than 10 minutes. Because the dough is butter-heavy refrigerating for too long makes the cookies "melt" when they're cooking in the oven. When the cookies come out let them sit on the pan for a minute. Make sure when removing them from the sheet that you slide the spatula all the way underneath. If you press too high up on the side they can crumble. After removing them from the pan let them cool on a cookie rack. 


Enjoy! One of the things I love about these cookies is even though they aren't "healthy" they're perfect because I only want one or two with a cup of tea, whereas some other cookies I want to eat a dozen in a sitting. 


2.12.2012

Cranberry Chocolate Chip Scones


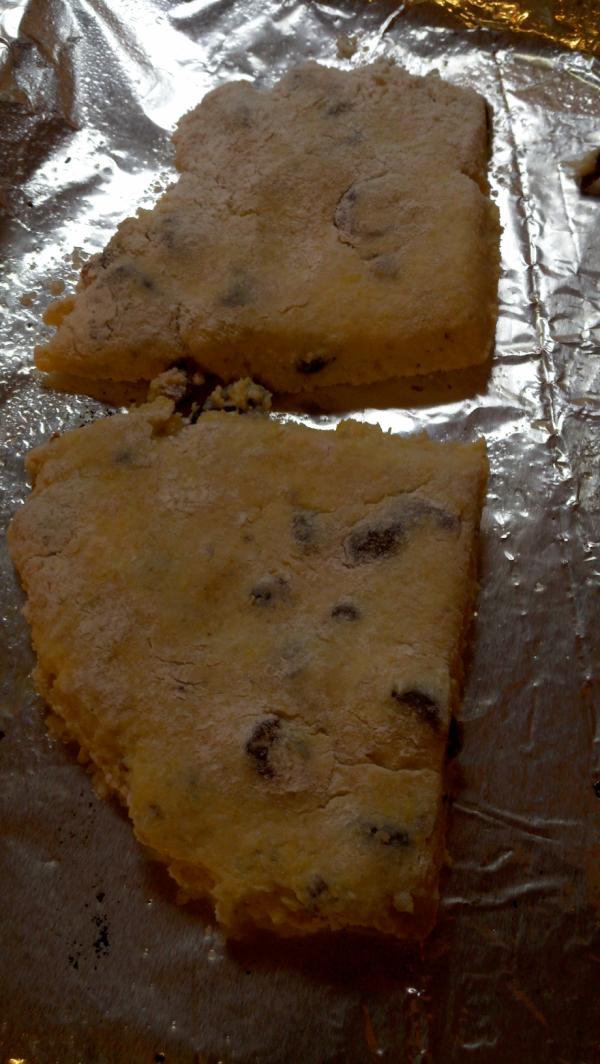
I almost called this recipe "Pregnant Lady Scones" because it was born out of a craving. I really wanted goat cheese scones. I make them sometimes and they're light and fluffy and delectable. But alas, no goat cheese in our house and it was breakfast time. So I pulled some cream cheese out of the fridge. Next up, what was breakfast-y? I found some dried cranberries in a drawer. By the time I had mixed the dough I had  "needed" lemon, cornmeal & at the last minute I tossed in some chocolate chips. They came out super yummy so enjoy!

Note: In my "cravings cloud" I failed to take pictures of the early process. Forgive my hazy mind....

Cranberry Chocolate Chip Scones (makes 12)

1 1/4 cup cornmeal
1 cup flour
1/2 cup buttermilk (or whole milk) (For fluffier scones take out of the fridge early and let it warm up)
1 egg
2 TBS butter
4 oz cream cheese
1 TBS baking powder
1/2 tsp salt
2 TBS lemon juice
2 TBS sugar
1 TBS lemon zest (optional)
1/2 cup dried cranberries
1/3 cup semisweet chocolate chips (optional)

1. Preheat oven to 350. Line a cookie sheet with tinfoil & spray with cooking spray.

2. Cream butter, cream cheese, sugar, lemon juice & lemon zest in a mixer. Add in cornmeal & flour. Mix until the dough clumps and looks like grainy wet sand.

3. Add in egg, buttermilk, salt, and baking powder and mix until smooth. Don't overmix. Overmixing results in dense scones.

4. Add cranberries and chocolate chips if using them.


5. Scoop 1/3 of the dough onto a floured surface. 


Squash down with your hands so that it makes a round about an inch thick. Flip it once so that both sides are floured. 


Cut into quarters. 


Place on prepared cookie sheet.


Repeat until you have 12 scones. Bake at 350 for 14 minutes. Pull out of the oven and enjoy warm or wait for them to cool. Yum! Like most scones these taste best the day they're baked. They increase in denseness for each day they're stored. 


2.05.2012

Healthy & Delicious Bran Muffins


I like bran muffins. Bran used to be a dirty word- it meant you needed some help in the poop department. I just think they taste great and most folks don't get enough fiber in their regular diet. One of my favorite things to do is to go to City Market and browse their bulk section for items under 75 cents a pound. Then I create cheap recipes around them. Their wheat bran is frequently on special for .59/pound and you need to get a lot to make a pound. Since it is so light and fluffy the muffins come out moist and with a great texture.

A pound of wheat bran is roughly the size of a medium pumpkin. 

This recipe contains no eggs, no oil, and can be made vegan if you use soy milk instead of dairy. They freeze fantastically and taste great popped into the microwave for a minute. The recipe makes 2 dozen but I frequently make a double recipe, all the pictures below are from a double recipe. I split the double batch into 4 so that I could make different flavors- Plain, Date & Raisin, Banana Blueberry, and Strawberry.

Stump Bran Muffins - Total Recipe Cost 2.65 or .11/muffin (plus cost of add-ins)
(makes 24)

3  cups wheat bran (was on special for .59/lb- 1 cup=1.6 oz, 4 cents/oz) .20
2 cups nonfat milk (see hint below about powdered milk) .50
1 1/2 cups applesauce (I used homemade but am estimating cost to buy here.) 1.25
1 tsp salt (kosher- if using table salt halve it)
2 tsp baking powder
2 tsp baking soda
3 TBS maple syrup
1/4 cup brown sugar .20
2 cups rye flour (You can use whole wheat or white. I prefer the rye because it gives the muffins a great hearty flavor.) (I buy in bulk for .99/lb. There are roughly 4 cups per pound.) .50

Pre-recipe hint: I buy nonfat dried milk packets. A box costs $9.99 and contains 8 packets. Each packet makes roughly 5 cups of nonfat milk. This comes to a cost of 25 cents a cup. It stores dry and since I try to only go shopping every 3 weeks it makes it easy to keep on hand for baking. To make it I put 4 cups of water in my large Pyrex then remove 1/4 cup with a quarter cup measure. Add the packet and whisk. Store leftover in a glass jar in your fridge.

1. Preheat oven to 375. Put wheat bran in mixing bowl and add milk. Mix until it starts looking a little spongy. Let it sit for 5 minutes and the wheat bran will absorb all of the milk. 


2. Add applesauce and other ingredients and mix well. We did a $50 truckload apple picking in the fall so we used one of the many jars of applesauce/apple butter we had on hand. I use cinnamon in my applesauce so if using plain applesauce I recommend adding some cinnamon. 

That's a lot of apples! And we picked twice this many, splitting them between several families. 


3. At this point in time I dosed out 12 plain muffins. 


Bake for 15-20 minutes at 375. 

Each muffin cup holds one large spoonful of batter. While each batch is cooking I prep the next batch. I spoon 12 spoonfuls of batter into my large pyrex and add mix-ins. Some ideas are raisins, walnuts, dates, strawberries, blueberries, coconut, bananas, or chocolate chips. I tend to add in 1 cup of mix-ins. 

Strawberry Bran 
Date & Raisin Bran

4. Let cool on racks and put into Ziploc baggies to freeze or enjoy immediately!