Pages

Showing posts with label Baby. Show all posts

7.09.2012

Surviving As a New Mom


Every mother is a new mother at some point in time. Now with my third child laying next to me I can tell you that it's different with every child, but that there are some constants. You'll simultaneously love the cooing little creature who looks up at you and curse them for taking away your sanity through sleep deprivation. You'll hold up tiny little outfits that they may wear and then remove the same tiny outfit moments later when it has been defiled from one of two ends (or both if it's a really special day). Nursing will be the worst/best experience you've had. One day your nipples will feel like they'll fall off, another day you'll gaze down in amazement while the baby eats and feel all powerful, and some days you'll just feel like a cow. Or maybe that's just me. As a former dairy farm tenant I remember watching the cows get milked with a complacent look on their face. I feel one with the cow some days.

It gets easier. I promise. Sleep will return and there will be days when you'll have 20 minute stretches of silence. Your baby will hit milestones and your heart will fill with joy. But no one ever tells you how to get there. If I could give one piece of advice to new moms it would be to pick an achievable goal that you will do every day. One thing, that's it.

I made a vow that I would shower daily. I use the term shower loosely, some days it was a rinse while the baby cried in the bouncer on the bathroom floor, some days the shower involved a toddler between my feet playing with duplos on the tub floor, and some days when my wonderful husband was home I got ten glorious minutes of hot water running over me uninterrupted. The goal was a shower and if I accomplished it then all was good. I had accomplished what I needed to for the day and anything else was a bonus. The laundry might be piling up, the kitchen floor could be filthy but I was clean and I felt human. And the funny thing is once you feel good about yourself, you naturally get more done.

Set a goal- be it a five minute morning mug of coffee quietly enjoyed, a shower, a load of laundry, weeding a flowerbox, wiping down the table, throw out junk mail or writing a thank you note- and I promise if you complete it daily normalcy will creep back into your life. And once you've accomplished your goal go hug your baby and enjoy them knowing you are awesome.

5.29.2012

What to Have on Hand for Yourself After Baby is Born


I realize I haven't posted in a bit but really I haven't fallen off the face of the earth. A combination of staying at my parents while waiting for Baby Girl to arrive, a family emergency involving my father in law being hospitalized overseas while on vacation, and the baby finally coming kept me away from my computer longer than I expected.

Our newest wee one arrived on May 16th after a brief induced labor. It was the first time I've made it this far- 39 weeks. She was 7 lbs, 3 oz and it is strange to see her wearing outfits that didn't fit her older sister until she was 6 weeks old! She's eating well and I'm happy to say I had my 3rd natural childbirth.

There are lists upon lists out there of what to buy for baby and getting ready to bring baby home. But what about mom? In preparation for my 3rd child I knew what to have on hand so for the uninitiated here is a list of basics that are good to have waiting for you at home. (I apologize in advance if some of this contains TMI.)

- Tylenol
- Motrin (this helps with inflammation and can also help with breast tenderness and inflammation if you become engorged)
- Stool softener (ahh- yes the not so pleasant fun of post natal life that no one likes to talk about. You may have to get stitches. And if you do you'll be happy you had these on hand.)
- Pads. (There will be bleeding. Have them on hand.)
- Instant heat packs or a hot water bottle. Helpful for both bottom pain and breast pain.
- Ice packs. Same deal- bottom and breast engorgement.
- A bucket. (There is something about hormone readjustment after birth that can make some women relive their first trimester nausea. Sadly, I am one of them. So I keep a bucket nearby.)
- A hand pump. (Many breastfeeding mothers will rent a hospital grade pump. These are great. However, in the first few weeks as your nipples adjust to their new job they may be too tender for the pump. I found that a hand pump allowed me to relieve some pressure without feeling like I needed to bite down on a leather strap. I particularly like the Avent handpump. )
- Tank tops. (I was never one to spend a lot on nursing shirts/bras. I have two bras but let's be realistic. If I'm at home I probably am just going to have my shirt pulled down. Tank tops work great, pick up a few cheap and you won't care when you're covered in spitup and leaking milk. )
- Food. Breastfeeding makes me ravenous so I stocked the cupboards ahead of time with one handed snacks like granola bars (I made mine using this recipe), presliced and frozen homemade loaves of bread that I could microwave one at a time, popsicles (they make me happy and are easier to eat than ice cream) and loads of cut up fruit. I also made some mason jar salads for quick lunches.

Hope this helps soon to be moms out there. It will all even out in the first few weeks. (If it counts for anything I am typing this with a Mombo pillow around me and am currently breastfeeding.) What did you like to have on hand for after birth?

4.28.2012

DIY Cloth Diaper Doublers (AKA "Soakers")


Finished Stack of Doublers
We started cloth diapering our daughter when she was a wee little baby. Our motivation for choosing to cloth diaper was twofold: we wanted to reduce our "waste" and not contribute diapers to a landfill for hundreds of years and second cloth was going to be cheaper for us. We use Flip diapers, prefolds, and doublers and the set up was fairly inexpensive. With the new baby coming and the 20 month old teetering on the edge of potty training we knew we needed more supplies but didn't want to go overboard. Prefolds were cheap to buy more of, the covers I am currently experimenting with making, and I was incredibly pleased with the way my DIY doublers came out.

After researching extensively on materials I determined that most doublers use a cotton batting type "soaking" material on the inside. Be sure to get the quilting style batting which is absorbent but much thinner. You don't want the fluffy pillow-style batting.  After much deliberation I decided to use cotton flannel for the outside layer. Cotton flannel wicks moisture away from the baby and is affordable. Other options are microfleece (make sure you use micro and not regular fleece which "pills" water on it's surface) or a brushed microsuede but fabric for those other two options is pricey. I find that the cotton flannel works perfectly for us. In addition, the doublers I made that are pictured are white but I also found some sale pink polkadot cotton flannel and when I finish that batch our daughter will be peeing in style. Feel free to experiment with colors. 

You will need:
Cotton batting (look for the prepackaged quilt batting- alot of times they go on sale in the spring and you can use a coupon as well- if you purchase by the yard batting is $10.99, I purchased this queen sized batting on sale for $19.99 plus I had a 20% off coupon- the size was roughly 6 yards which means that I spent $2.67/yd)

Cotton Flannel (I purchased a yard for $4.99 plus 20% off= 4.00, a yard will make roughly 10 doublers depending on how you lay out the template.)
Two templates traced on cardboard or paper
Thread

1. The first thing you will need to do is trace the doubler that you wish to replicate onto a sturdy piece of paper. I used an old calendar. Cut this out. This is your batting template. Now trace the doubler again adding about a half inch to the edges. This will be your cotton flannel template. (For the sake of clarity and sanity use a different type of paper so you can tell the two templates apart at a glance.) You'll want to cut the cotton flannel slightly larger than the batting to make it easier to sew the seams, that's why we make two different templates. My doublers were roughly 4" wide by 12" long. 


Cotton Flannel Template & cut piece of cotton flannel
2. Cut all your pieces. You will need two pieces of cotton flannel for each doubler and 3 pieces of cotton batting. It is your choice if you want to add more layers of batting for a thicker doubler but 3 layers replicates a traditional doublers soaking strength. Lay a piece of flannel fuzzy side down on the table and put the 3 batting layers on top. Top it off with a piece of flannel fuzzy side up. (The "wrong" sides of the flannel should be facing the batting.)


3. Sew around the edge of the doubler. I triple seam it and do reverse stitching at the beginning and end of the run to reinforce the seams. You want a strong solid edging because these will be washed frequently. If you had a serger you could serge the edges, however, that is a toy that I don't have yet!


4. Sew a seam down the middle of each doubler to hold all the batting layers together and in place. If you skip this step the doublers will bunch in the wash. 


Trim the edges for a neater look being sure not to cut the stitching. And that's it! You're done. It probably took me less than 7 minutes to sew each doubler. These cost $4.95 each new and in 30 minutes I had made 4 at a cost of roughly .67/each. That is what I call a good investment!

It was almost a little sad how much I beamed with pride over this stack of doublers. Especially considering they are now peed on daily!


4.23.2012

Baby's Best Friend

I grew up in a pet-free household. Unless you count some outdoor rabbits that lived in a hutch across the yard and the occasional goldfish my mother did not believe in indoor pets. This meant that by the time I left the house all I wanted was a pet.
I had one mini dachsund who was the love of my life but a cross country move to a small apartment sadly left her rehomed. After my husband and I married we started counting down the days until we moved out of our condo and got a house. My husband had grown up with dogs around and is the type of bleeding heart dog lover who walks into a shelter and wants to bring them all home. During our dog-free condo time we adopted a gigantic rabbit named Zeus who thinks he's a dog. He has many strange habits including an affinity for eating meat.
The rabbit sneaks a bite of a quarter pounder. We also can't leave the dog food on the floor because he eats it.

He likes to keep me company while I work by napping on the bottom shelf of my desk.


Once we bought a house and bought a truck the dog was the next natural addition. Among our criteria a patient dog who would be friendly but intimidating to intruders and no hounds who would attempt to eat the rabbit. My 6 year old and I went to the shelter and fell in love with a boxer mastiff mix who was patiently allowing all his brothers and sisters to climb all over him with no complaints. Our daughter was 6 months old at the time and doesn't remember life without her furry brother. Sometimes I think he's her favorite family member. 
(Yes this is a shameless ploy to share adorable pictures.)

Walks in our woods.

He even got along with the rabbit. 

Her favorite person to kiss.... even when she refuses to hug the rest of us the dog always gets love.

They're starting to share facial expressions. 

He cuddled her through the chicken pox. 

After a morning of terrrorizing mommy the partners in crime take a nap break.

As someone who didn't grow up with a dog I don't fully understand the bond that my daughter and her dog share but I'm so happy that they have each other. :)


4.15.2012

How to Make Absorbent Breast Pads


As a soon-to-be third time mother I'm in the depths of baby prep. With a 20 month old running around we have many of the items on hand that I need but I've been making a little list of "things to do" and make before baby comes. Breast pads were one of them. They also make great homemade baby shower gifts for expectant mothers. I made some for a friend as well and I thought they looked quite cute all packaged up in a little drawstring bag.


If you read my blog regularly you may have figured out by now that I like finding multiple ways to use things and ways to do things the cheapest. I made a baby quilt for a friend's baby shower (tutorial coming soon!) and lucked out on some queen size cotton batting sheets for 19.99 at Joann Fabrics (regularly 39.99). Plus I had a 20% off coupon. They contained roughly 6 yards of batting which broke down the cost to 3.33 a yard (2.67/yd including the 20% off) versus the normal by the yard cost of 10.99. They were also all-natural which was great. I grabbed two figuring they'd be great to have on hand and they also fit another project I was working on - doublers for cloth diapers. After finishing the baby quilt I had stacks of 4" squares left that I had cut (mental note- you only need half as many quilt squares as patterned squares :) ). They were the perfect size to make reusable breast pads that would fit into a bra for nursing mothers. Cotton tends to be the choice for reusable pads that you can buy in the store as well. I prefer the reusable pads over the disposable one because the plastic lining in the disposable pads is sometimes thought to contribute to excess moisture leading to chapping and thrush. 

Each set of pads probably took me less than ten minutes. Here's how I did it:

1. Cut 2-3 squares of quilting batting (100% cotton) or use leftover squares. You'll be stacking the batting squares to form the soaking pad so it is a matter of personal preference on how many to use. I used two layers since the batting was nice and thick. 

Square of batting
Find something circular to trace for the pad (or steal your kids compass). I used a Chinet plastic cup. The top had a diameter that took up almost the whole 4" square. Keep in mind that these will shrink a little bit when you wash them the first time so make them a bit bigger than you think you'll need.

Trace around the circular object. I've got two squares under this cup.

I traced with a sharpie. It washed off the first time I washed it since most of the color stays on the fuzzy surface of the batting.
2. On your sewing machine sew with a thin stitching around the circle. You want a total of two "laps" so I just go around the circle twice without stopping. Be sure to do a reverse stitch at the beginning and end which will help strengthen your seams. Sewing in a circle shape can be a bit tricky for beginners so go slowly. The nice added benefit of sewing a circle is that it helps the fabric form a little cup which makes them sit in your bra really smoothly.

Make sure that you have however many squares you'll be using stacked together when you sew. If you seam them individually you'll have to sew them all together later which is a pain. 

Use scissors to cut around the seaming and remove all the excess square fabric.

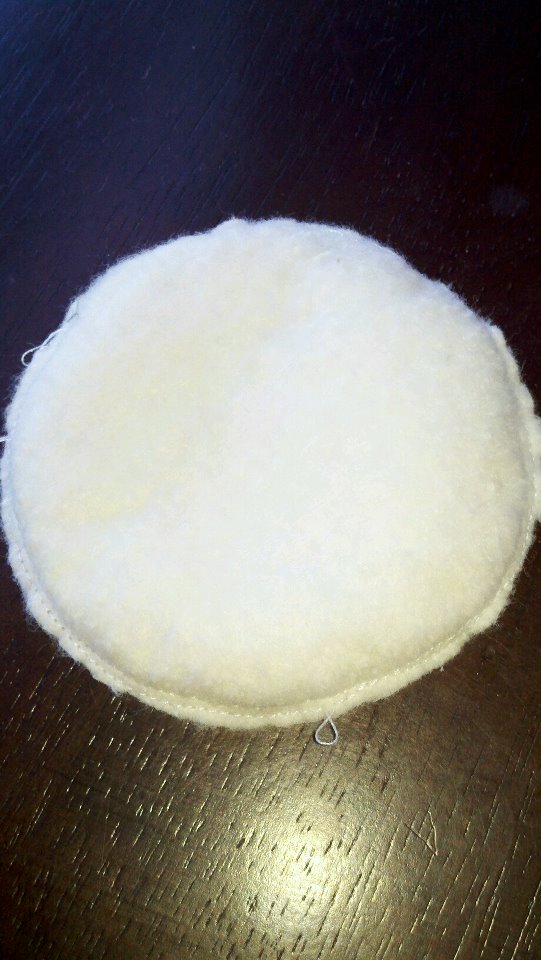
You'll be left with a nice circular pad.
3. To prevent bunching when you machine wash them you'll want to sew a big "X" on the pad to hold the layers of batting together. I just ran a quick seam horizontally and one vertically. Tie of the threads at the end and snip excess.


Voila! A stash of soaker pads. Each set of two took less than 10 minutes to make so you could churn out a bunch fairly quickly. I washed these with my daughter's clothes and they "compacted" a tiny bit but didn't shrink significantly. 

Two sets of breast pads. Package them in a cute drawstring bag for a great baby shower gift. 
I estimate the cost of two sets to be under a dollar to make, as it used far less than a yard of batting ($3.33/yd). The final cost will vary based on the batting that you purchase. I strongly suggest checking out full quilt batting at this time of year as they usually go on sale at the start of warmer seasons. You can also pretty these up a bit if you want by including a layer of printed or colored flannel on the outside. It will wick moisture away and provide a little "personality".

Happy Sewing! 

(Please link back to my blog to share the tutorial- or contact me at ramblingstump (at) gmail.com for permission to post the full tutorial on your blog with a link back.)