 |
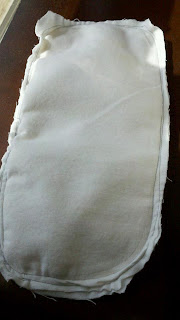
| Finished Stack of Doublers |
After researching extensively on materials I determined that most doublers use a cotton batting type "soaking" material on the inside. Be sure to get the quilting style batting which is absorbent but much thinner. You don't want the fluffy pillow-style batting. After much deliberation I decided to use cotton flannel for the outside layer. Cotton flannel wicks moisture away from the baby and is affordable. Other options are microfleece (make sure you use micro and not regular fleece which "pills" water on it's surface) or a brushed microsuede but fabric for those other two options is pricey. I find that the cotton flannel works perfectly for us. In addition, the doublers I made that are pictured are white but I also found some sale pink polkadot cotton flannel and when I finish that batch our daughter will be peeing in style. Feel free to experiment with colors.
You will need:
Cotton batting (look for the prepackaged quilt batting- alot of times they go on sale in the spring and you can use a coupon as well- if you purchase by the yard batting is $10.99, I purchased this queen sized batting on sale for $19.99 plus I had a 20% off coupon- the size was roughly 6 yards which means that I spent $2.67/yd)
Cotton Flannel (I purchased a yard for $4.99 plus 20% off= 4.00, a yard will make roughly 10 doublers depending on how you lay out the template.)
Two templates traced on cardboard or paper
Thread
1. The first thing you will need to do is trace the doubler that you wish to replicate onto a sturdy piece of paper. I used an old calendar. Cut this out. This is your batting template. Now trace the doubler again adding about a half inch to the edges. This will be your cotton flannel template. (For the sake of clarity and sanity use a different type of paper so you can tell the two templates apart at a glance.) You'll want to cut the cotton flannel slightly larger than the batting to make it easier to sew the seams, that's why we make two different templates. My doublers were roughly 4" wide by 12" long.
 |
| Cotton Flannel Template & cut piece of cotton flannel |
3. Sew around the edge of the doubler. I triple seam it and do reverse stitching at the beginning and end of the run to reinforce the seams. You want a strong solid edging because these will be washed frequently. If you had a serger you could serge the edges, however, that is a toy that I don't have yet!
4. Sew a seam down the middle of each doubler to hold all the batting layers together and in place. If you skip this step the doublers will bunch in the wash.
Trim the edges for a neater look being sure not to cut the stitching. And that's it! You're done. It probably took me less than 7 minutes to sew each doubler. These cost $4.95 each new and in 30 minutes I had made 4 at a cost of roughly .67/each. That is what I call a good investment!
 |
| It was almost a little sad how much I beamed with pride over this stack of doublers. Especially considering they are now peed on daily! |


I'm glad my diaper days are past, but I have to say what a good idea!
ReplyDeleteThanks for all the helpful details! This is exactly what I need to do. I made some nursing pads and I bought bamboo batting for that, so I'm going to use it here. We've been using disposables overnight, but I'm ready to take on cloth overnight, too.
ReplyDeleteHi, I know this post is a little old but I found it very informative, but I just wanted to ask a couple questions. How well do these soaker wash up? Do they hold up well? How long did you usually get before you needed to make new soakers? Also was wondering what detergent you recommend for these? Does it make a difference? Thanks! Love the instructions and pictures!
ReplyDeleteIt's inspiring to hear about your commitment to sustainability and cost-effectiveness through cloth diapering for your daughter. By choosing cloth diapers, you're actively reducing your environmental footprint and avoiding the long-term impact of disposable diapers in landfills. It's commendable that you're also exploring DIY solutions to expand your cloth diapering supplies without breaking the bank. Your resourcefulness and creativity in making your own diaper covers and doublers are truly impressive. Additionally, it's worth considering innovative solutions like diaper recycling technology (https://diaperrecycling.technology/) to further address environmental concerns associated with diapering. Integrating such advancements into your cloth diapering journey can amplify your efforts in promoting sustainability and reducing waste.
ReplyDelete