Pages

7.28.2012

Homemade Seeded Energy Bread


We make bread 3 times a week. My son, who is here for the summer, started talking about a 21 grain bread by Killer Dave's that he has at his other house. We looked online and I determined that it was a mix of seeds and flours. I don't sweeten my bread so I was unsure of how popular the end result would be with an 8 year old if I omitted the cane syrup and molasses but I decided to give it a go. I raided our cupboards for seeds and grains and the end result was amazing if I do say so myself. It even uses chia seeds which are a great source of energy and very filling. This bread is the perfect start to my day spread with Pineapple Basil Preserves (recipe coming soon).

I asked my son what he would do if he liked this bread better than Killer Dave's. His response? "I'll ask for more." (And he did- it apparently is "Way better" and "Awesome").

We took a family poll and have deemed this bread Robust Rabbit Loaf. We have a robust (rotund) rabbit so we thought we would honor him with his own loaf.

A favorite nap spot- the bottom shelf of my desk. 


Robust Rabbit Loaf
Makes 2 loaves
3 cups hot water
1 1/2 TBS salt
1 1/2 TBS yeast
4 cups flour
1 1/2 cups cornmeal
1/2 cup rye flour
1/2 cup soy flour
1/2 cup sunflower seeds
1/4 cup sesame seeds
1/4 cup chia seeds
1/8 cup flax seeds
1/8 cup poppy seeds
3 TBS fennel seeds

1. In the bowl of a mixer with a dough hook attachment mix the water, salt, and yeast. Add the flours 2 cups at a time. This recipe makes a fairly heavy loaf- to lighten it a little reduce the amount of flour and up the soy flour. The soy flour yields a little extra lightness.

2. Once all flours have been added and the dough is mixed up add all the seeds in and mix until they are incorporated. Let the dough rise for 1-2 hours. (The warmer your kitchen is the faster it will rise.)

3. Preheat your oven to 450. Set a timer for 15 minutes. Spray the inside of two loaf pans with cooking spray. Split the batter between the two pans by pouring it in. Use a spatula to scrape any excess off the bowl. No punching or forming necessary.Set the loaf pans near the stove. The heat as it preheats will help the dough rise a little more. Bake for 25 minutes. Enjoy warm slathered with butter or jam!

7.24.2012

Cheeseburger Risotto

The perfect meal for an overcast stormy day, this meal is the epitome of comfort food. The kids loved it and for the grownups it was like a classed up version of Hamburger Helper (without the hard to pronounce additives). This one will definitely live in my normal rotation.


Cheeseburger Risotto
(serves 4) 

1 lb ground beef
1 clove garlic or 1 tsp garlic powder
1 TBS butter
1 TBS oil
1/2 cup red wine
1 1/2 cups arborio rice (I find it is much cheaper to buy this in the bulk section than in containers)
8 oz canned diced tomatoes & their liquid (I used the leftovers from a 32 oz can from another meal)
8 oz shredded cheese (I used Cabot Bacon Cheddar which I highly recommend but you can pick anything)

1. In a saucepan, brown the ground beef. While the ground beef is browning melt 1 TBS of butter in a stockpot. Add the oil to the stockpot and dump in the arborio rice once the butter is bubbling. Using a wooden spoon move around the rice to "toast it". When the kernels look translucent around the edges with a white spot in the middle dump in the wine. It should make a nice "poof" noise. If you don't want to use wine just replace it with another liquid. Stir the rice rapidly. 

Let the rice "toast" in the butter & oil.

2. Add the garlic to the ground beef. I used raw (not cured) garlic so I just sliced it in half and removed it before we ate it. Raw garlic is really pungent so I didn't want anyone biting into it. You could mince a regular clove of garlic or use garlic powder instead.


3. You're going to start slowly adding the liquid to the rice. I put half the tomatoes in my measuring cup and then added hot water to make 2 cups. You want to add this slowly and stir frequently. I add about 1/3 cup of liquid at a time and then add more after it has been absorbed. Make sure the heat is closer to medium than high. If the heat is too high the liquid will boil and evaporate instead of being absorbed and you'll end up with kernels that are crunchy in the middle. After you've gone through the 2 cups of tomato water make a second 2 cups. You want to add a total of 4 cups of tomato water to the risotto.

Tomato Water

Add the liquid a little at a time.
4.  Once all the liquid has been absorbed add the ground beef to the risotto and mix it in.


Add the cheese and mix that in as well. 


Dish out and enjoy! 


7.19.2012

Keeping Your Head Above Water When Parenting

Pre-incident

I've been held up at gunpoint twice in a retail store setting. My hands were ziptied behind my back and I counted silently to myself to try to determine how long I needed to wait to try to get help. A home invader in Texas was scared off by my dog while my infant son sat in a car seat nearby. I shudder to think what he wanted with me. These moments have left me fairly confident that I can deal with difficult situations. I feel lucky and blessed and appreciate the levelheadedness that I bring to tough times. And then this morning I'm running on slippery tiles alongside a heavily chlorinated pool in flip-flops with my 2 month old still attached to my boob yelling "Hey, hey, HEY!" to the instructors during free swim.

I put my son in swim lessons because I didn't want him to be like me. I can tread water for hours, I am a fairly strong swimmer, but I can't go under water without holding my nose. I know, lame. It definitely became awkward at pool parties in high school where I'd be hugging the wall furthest from the pool so that no one would throw me in. And the one time I did get thrown in I hacked on the side of the pool like a wet cat for 20 minutes. Very attractive.

It was the last day of swim lessons. The little kids were already out of the pool eating cupcakes and drinking juice boxes. My son's group was jumping into the pool. I was settled on a bench nursing the baby and listening to shouts of "Cannonball!". They were all shoulder to shoulder in the pool and I noticed that one boy in the class, who spent the first few days holding the side of the pool, was reaching for Ry's shoulder. And in the next instant Ry was underwater and the boy was nervously scaling him and flailing. For one second I was frozen trying to figure out if they were playing. And then I could see that Ry was frantically trying to wave his hands and was pushing on the bottom with his feet. The boy's father was watching them too and I thought for sure he'd say something. After all, he was right there and I halfway down the pool with a tiny barracuda on my breast. If I could see the struggle surely he could? But nothing happened. The adrenaline kicked in so I ran, nursing shawl streaming, baby bouncing, yelling my brains out. And a tiny sane piece of me was scanning other parents on the sidelines as I ran trying to figure out who looked like they would catch a tossed 2 month old the best if I had to jump in. Luckily, the instructor realized they weren't playing around and she hauled the boy off of Ry and got him to the side of the pool. I helped him out and everything in my body just oozed with manic mommy energy. Struggling to hold Sohayla, I got him near a window and he hacked up half the pool and sobbed.  It took every single ounce of my willpower to not sob with him, I was already shaking, but I didn't want to scare him anymore. He sat on my lap for a bit. I dried him off limb by limb like I do for my toddler, thinking about how big he's gotten.

In the midst of my thankful thoughts I noticed that the boy's dad was hovering. I tried to kill time because honestly I wasn't ready to say "It's all right" yet when the apology came. Well, silly me. There wasn't to be an apology. "Is he all right?" the boy's father asked. I let him know that he was pretty scared and his throat hurt a bit from the pool water but he would be ok. And then the moment came, the one where he should have just quit while he was ahead, he started talking about how they were really both all over each other trying to stay up out there." I'm sorry, WHAT? Are you really making it sound like both of our kids were floundering and having trouble and reached for each other? My son hacked water on the side of the pool for ten minutes and is now asking to stay home from day camp (which he loves) and your son just put three cupcakes in his mouth!  Seriously? I understand completely that it was not your child's fault. He panicked and he's learning to swim. He didn't do it intentionally. It was an accident. But have we really become a society where we try to spread the "blame" so that our kids don't "feel bad"? Because that will be a sad place to live.

Tonight I'll cook my son shrimp (his favorite), give him an extra hug and kiss when I put him to bed, and drink a glass of wine (my favorite). And tomorrow I'll try to get him into the pool again.

7.18.2012

Hidden Veggies Beet Spaghetti Sauce

beet recipes, beet spaghetti, csa recipes, quick dinners

Think your kids won't eat beets? We kept getting them in the CSA basket and I was determined to do something with them that was different. Beet recipes so often gear towards roasting and I wanted to put them into something that was already a hit in our house. Success! My son had seconds, my daughter loved the purple color and I loved that there was a pound of veggies crammed into the sauce. This recipe pulls double duty because you can use leftovers over mashed potatoes or as a sloppy joe filling.


Hidden Veggies Beet Spaghetti Sauce
(serves 6-8; great for leftovers)

1 lb ground beef
6-8 oz mushrooms
4 oz spinach
1 oz arugula (optional- I love the peppery bite it gives the sauce)
6 oz beets, tops & roots removed (no need to peel)
1 can plain tomato sauce
1/2 tsp garlic powder

1. Brown ground beef in a saucepan. Drain off the fat. While the beef is browning de-stem and slice the mushrooms.

2. Add mushrooms to the ground beef. 


3. Measure out 4 oz spinach, 1 oz arugula and 6 oz beets (roughly one small bunch). 


Chop them all up in the food processor. 


4. Add the veggies to the ground beef and mushrooms. Add a can of traditional spaghetti sauce (I use generic Hannaford's brand 95 cent sauce). Stir to combine. Add garlic powder and heat through.


5. Serve sauce over noodles, potatoes or as the filling for sloppy joes. Enjoy!


7.11.2012

How the Heck Does a Moby Wrap Work?


I decided to try something new with baby #3. I traded in my sling (which I found to be to hot during the summer) and got myself a Moby wrap. What can I say, I was being a follower. Everywhere I went I heard about how great they are and how they're on every mom to be's list. So I was swayed and I got one. I mean I cloth diaper and make my own laundry detergent. Why shouldn't I have an organic Moby wrap? Especially when I find one at the resale store.

Things I Have Done With My Moby Wrap:
* used it as a temporary clothesline between two chairs while folding laundry
* swaddled a whole gaggle of my toddler's dolls in it
* used it as a shawl when I got cold one day
* immobilized my 8 year old when my toddler and I were wrestling him (think hog-tied)

Things I Have Not Done With My Moby Wrap:
* worn it correctly to carry the baby

Seriously though- how the heck do you use this thing without an assistant on hand? Step 1 should be "Find someone to help". I'm 5'3" I can't reach far enough to wrap the ends around me properly. And as soon as my toddler comes up and starts yanking on me I panic thinking she's going to pull the wrong piece and the baby is going to come tumbling out the bottom. How do the ladies on the web site look so serene? I kept worrying about splattered baby. Maybe I'll keep finding other uses for it. (For the record most of the assembled furniture in our home was put together by me so usually I'm good with directions.)

I need to find a new sling of some sort to transport the baby at BlogHer. Something that doesn't make me look inept. Unless someone wants to give me the one on one petite user rundown on this thing.

7.09.2012

Surviving As a New Mom


Every mother is a new mother at some point in time. Now with my third child laying next to me I can tell you that it's different with every child, but that there are some constants. You'll simultaneously love the cooing little creature who looks up at you and curse them for taking away your sanity through sleep deprivation. You'll hold up tiny little outfits that they may wear and then remove the same tiny outfit moments later when it has been defiled from one of two ends (or both if it's a really special day). Nursing will be the worst/best experience you've had. One day your nipples will feel like they'll fall off, another day you'll gaze down in amazement while the baby eats and feel all powerful, and some days you'll just feel like a cow. Or maybe that's just me. As a former dairy farm tenant I remember watching the cows get milked with a complacent look on their face. I feel one with the cow some days.

It gets easier. I promise. Sleep will return and there will be days when you'll have 20 minute stretches of silence. Your baby will hit milestones and your heart will fill with joy. But no one ever tells you how to get there. If I could give one piece of advice to new moms it would be to pick an achievable goal that you will do every day. One thing, that's it.

I made a vow that I would shower daily. I use the term shower loosely, some days it was a rinse while the baby cried in the bouncer on the bathroom floor, some days the shower involved a toddler between my feet playing with duplos on the tub floor, and some days when my wonderful husband was home I got ten glorious minutes of hot water running over me uninterrupted. The goal was a shower and if I accomplished it then all was good. I had accomplished what I needed to for the day and anything else was a bonus. The laundry might be piling up, the kitchen floor could be filthy but I was clean and I felt human. And the funny thing is once you feel good about yourself, you naturally get more done.

Set a goal- be it a five minute morning mug of coffee quietly enjoyed, a shower, a load of laundry, weeding a flowerbox, wiping down the table, throw out junk mail or writing a thank you note- and I promise if you complete it daily normalcy will creep back into your life. And once you've accomplished your goal go hug your baby and enjoy them knowing you are awesome.

7.02.2012

Kale & Chicken Freezer Burritos


Kale is abundant at our CSA right now. I've made kale chips, I stirfry it with apples and bacon for quick dinners but I needed to do something new. After getting some sale priced chicken breasts, I cooked the entire package and made enchiladas with half. I shredded the rest and waited for inspiration to strike. Freezer burritos went over so well last time, and the idea of a quick meal has been super handy. With it getting hot out there are days where I just don't want to turn on the oven and having these on hand will solve that problem. My husband ate a few for lunch today, pronounced them "awesome" and they were child approved as well. The trick is to use the kale as a sauce to moisten the chicken.

There is a little Vermont humor in here too. We have an entrepreneur here, Bo Muller-Moore, who makes t-shirts that say Eat More Kale. Check out his website. Chick-Fil-A is currently suing him saying he can't use that phrase because it infringes on their "Eat Mor Chikin" slogan. Crappy spelling aside- I'm sure that most people can tell the difference between chicken and kale, the fonts are completely different, and there are no Chick-Fil-A's in the state of Vermont. I used to eat at Chick-Fil-A when I lived in Texas and I can tell you I will never set foot in one ever again after seeing the way that they bully small businesses. As a business that advertises themselves as a Christian business it is very un-Christian of them, unless they're trying to pull a David vs. Goliath.

Sorry- I got sidetracked. Anyways this recipe has more chicken in it than kale but the kale is truly the star of the dish. These burritos can be made to be frozen or served for a meal.

Kale & Chicken Burritos
(makes 16)

2 lbs of shredded chicken (I had crockpot cooked mine ahead of time. Great way to use leftovers.)
2 bunches of kale (roughly 24 oz)
2 TBS oil
1/2 large shallot
8 oz shredded Cabot Pepperjack cheese (I shredded a stick of it.)
1 tsp salt
16 flour tortillas

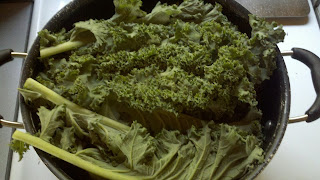
1. In a large pot on the stove, heat 2 TBS oil. Take 2 bunches of kale, chop off the bottom stems (don't bother taking out the large piece running down the middle), and cram them into the pot.


Using tongs flip the kale around a couple of times to get a little oil on it. Let it sizzle for about 5 minutes, then add 16 oz of water. Keep it on high heat and continue to flip the kale with the tongs. The kale should start wilting. 

2. In a food processor, chop the shallot. Add the kale a little at a time, until it is all blended into a paste. Add the salt and 4-8 oz of water. You want it to be a thick sauce not runny. The shallot is important- you want to use some strong flavors when freezing items so that the taste holds up.


3. I pre-tear sections of tinfoil and plastic wrap and lay a tortilla on each one ahead of time. For photos feel free to check out my last burrito post . Dump your pureed kale sauce into the bowl of shredded chicken and mix well. 


Dose out some of the kale chicken mix onto a tortilla. I used about 4 oz for each.


Top with cheese, I used 1/2 oz. I love my kitchen scale. 


Now fold in the sides and roll it up.


Wrap the plastic wrap around the burrito, then the tinfoil. This helps to keep it fresh and to prevent freezer burn. Now label them and load your freezer! Enjoy them for quick lunches or no cook dinners on hot summer days. (3 minutes in the microwave is about right)


6.30.2012

Pork with Mustard Sauce and Dill & Shallot Potatoes


It was hot today. Not melt your brain 108 degree hot like my Southern friends but hot for Vermont. I did a quick sear and oven bake of our pork to minimize the amount of time the oven had to be on. The end result went over well. My husband had thirds and the 8 year old gave me a hug and told me he loved me so I guess I did something right! Pork sirloin cutlets are frequently discounted in our supermarket and I personally like them better than chops so we use them a bit. Not a ton of pictures in this one because the toddler was wondering around with an ice pack on her boo-boo, the baby was spitting her binky out, and the 8 year old was questioning every single thing I was doing. In other words, a totally normal day.

Pork with Mustard Sauce
(serves 6)

3 lbs of pork sirloin cutlets
salt & pepper
1 TBS butter
2 TBS dijon-type mustard
2 TBS ricotta cheese (could also use sour cream)
1 TBS maple syrup

This could not be easier. Preheat the oven to 450 and cover a cookie sheet with foil. In a pan on the stove melt the butter. Sear the pork sirloin pieces on both sides so that you can just see a small line of pink in the middle. About 2-3 minutes on each side should do it. Lay the meat on the cookie sheet.


Put it in the oven for 10-15 minutes. It will depend on how big your pieces are. Using a meat thermometer the pork should reach a temperature of 160. The USDA recently dropped their guideline to 145 but I feel better cooking it to 160.

While the pork is cooking mix together the mustard, ricotta, and maple to make your sauce. You can use sour cream if you'd like. I always have ricotta on hand and love the creamy texture it gives the sauce.

Dill & Shallot Potatoes
(serves 6) 

6 medium red-skinned potatoes
1/2 tsp salt
3 TBS butter, split
1/4-1/3 cup milk
2 TBS fresh dill
1/2 large shallot, sliced

Rough chop the potatoes into chunks (leave the skins on) and toss them into a pan of boiling water. Boil for roughly 8 minutes or until fork tender. In a saucepan, melt 1 TBS of the butter and brown the sliced shallots in it. Drain potatoes and put them into a mixing bowl. Add 2 TBS of butter, the browned shallots, salt, and dill and mix. Add milk slowly stopping when the mixture comes together.


Serve with a green salad if you'd like and enjoy!


6.27.2012

Garlic Scape Gnocchi with Mushrooms


Garlic scapes. Google them and you'll find 800 million garlic scape pesto recipes. These curly green snake-like veggies are abundant at my CSA at this time of year. I have to admit, I'm tired of scape pesto so I shook things up a little bit. It was freakin' delicious to shake things up. After roasting the scapes I blended them into a gnocchi base. The result? A mellow garlick-y green delicious fluffy ricotta pillow. These will happen again!


Garlic Scape Gnocchi with Mushrooms
Serves 4

Big Bunch of garlic scapes- enough to cover a cookie tray (I used about 1/2 lb)
1 egg
1 tsp salt
8 oz ricotta cheese
1 1/4 cups flour
1 1/2 lemons
8 oz mushrooms
2 TBS butter

1. Preheat oven to 325. Spray cookie sheet with cooking spray and lay scapes on it. Roast for 8 minutes and shut oven off. Leave the scapes in for a few more minutes. (If you roast for longer than 8 minutes the tips tend to burn- shutting off the oven avoids any burning.)


2. Shove the scapes into a food processor. Don't worry if you really jam them in they'll fit :) 


Process the scapes with the blade attachment until they are finely chopped. 


Add the egg, ricotta, salt, flour, and the juice of one lemon into the processor. Make sure you measure out the ricotta.


The result should be a thick paste-like dough. 


3. Flour a counter and take out a sharp knife. Set up a floured cookie sheet to put finished gnocchi on. Take the gnocchi one large spoonful at a time and roll in flour. Roll out into a snake-like shape and chop into little gnocchis. This part is really challenging to take pictures of so if you want to see step by step photos feel free to see a past post I did on Ricotta Gnocchi

Ready to go into the boiling water. 

4. Boil a large pot of water on the stove. You can also choose to freeze the gnocchi at this point to cook at a later date. This is a great way to have quick meals ready. To freeze- freeze in a single layer then transfer to a tupperware container once frozen. 
While you are waiting for the water to boil, melt the butter in a saucepan. Chop the mushrooms up and saute in butter. When the mushrooms are brown, add the juice from the 1/2 lemon. Lemon really helps to counteract the intensity of the scapes. 


Drop the gnocchi into the boiling water. Boil for 3-5 minutes. They will float to the top when they are ready. Use a slotted spoon to remove them. Don't drain into a strainer. The gnocchi will stick together and get gummy. 
Top with mushrooms and enjoy!


6.25.2012

Mexican Tuna Casserole


Tuna casserole evokes warm homey memories in many folks. I love to eat it but also adore experimenting with it. This time I decided to replace the cream soup and try to add some Mexican flavors. The results were met with overwhelming support from my husband and son. I love putting a crunchy topping in the ramekins and serving them individually.
You'll notice that in the recipe I use a half can of multiple ingredients. If you want to you can easily double the recipe, or you can double everything but the noodles and cheese and set aside half of the bean mixture to use for dip (it was delicious)!

Mexican Tuna Casserole
Serves 6

2 cups dry egg noodles
1/2 15 oz can black beans
1/2 15 oz can black olives
1/2 cup salsa
1 1/2 cups shredded cheddar cheese
2 cans tuna
handful of tortilla chips

1. Preheat oven to 350. Boil water in a large saucepan on the stove. Add 2 cups of dry egg noodles and set for 8 minutes.


2. In the food processor blend a drained can of black beans, salsa, and olives.


3. Once noodles are done cooking drain them. Mix in two cans of drained tuna. Add black bean mixture to noodles and stir. Add 1/2 of the cheese. 

Divide the mixture between 6 ramekins that have been sprayed with cooking spray. Crumble a few tortilla chips on the top of each one and then top with shredded cheese. (Note: If you want to be able to flip the casseroles out onto plates to serve you can put the tortilla chips and cheese on the bottom. )


Bake for 10 minutes at 350. 


Enjoy!